|
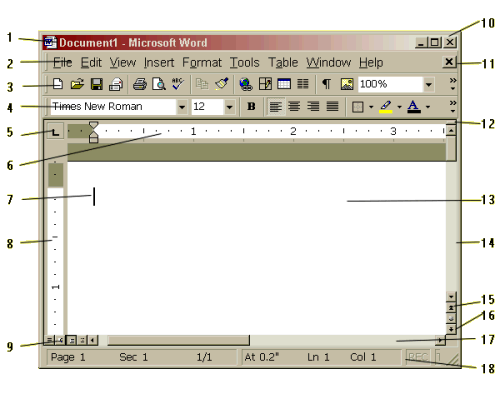
The parts of the MS Word Screen |
|
|
|
|
Page Layout View
|
|
The Title bar displays the name
of the software package: Microsoft Word.
It also displays the name of the current document: Documentl. (No specific name is given at this point.) You can begin typing immediately. Word will prompt you to name and save the document before you exit. |
|||
|
|
The Menu bar allows the user access to functions that are not readily available on the toolbars. | |||
|
|
The Standard toolbar
is accessible only with the mouse. By default, the Standard toolbar is on.
With the Standard toolbar, you can access certain functions more
quickly.
|
|||
|
|
The Formatting toolbar
is accessible only with the mouse. With the Formatting toolbar, you can
quickly access the most commonly used text layout and formatting
features.
|
|||
|
|
The Tab Set button. Each time you click on this button, it will change into the different tab choices available to you. Click here for a more detailed description of this feature. | |||
|
|
|
|
|
|
|
|
The Horizontal Ruler
Bar is accessible only with the mouse. With the horizontal ruler, you can
display and modify the position of margins, tabs and indents.
The white area of the ruler bars indicates the work area. The default tab sets are indicated by pale markers position every & 1/2" on the horizontal ruler bar. Diagram |
|||
|
|
The Insertion point
can be identified as a small flashing vertical line ( |
|||
|
|
The vertical ruler bar is only
visible in the page layout view. It gives you a visual reference as to the
length of your work. The top/bottom margins are depicted by shaded
areas.
In the example provided, there is a 1" top margin set. Notice that the work area also indicates 1", this indicates 1" of typed text. It does not reflect the number of lines as lines are dependent on font size. |
|
||
|
|
The Screen View options offer the user a quick way of changing how they look at their documents. Each has it own unique feature. By default, Word has been set to open in the visual that was displayed at the last session. If you close Word in the Page Layout view, it will reopen in that view. | |||
|
Normal (default) |
OnLine Layout |
Page Layout |
Outline |
|
|
|
Minimize/Restore/Exit buttons, located at the right side of the title bar. These are the Program level commands. | |||
|
|
Minimize/Restore/Exit buttons, these are the File level commands that effect open documents in your current session. | |||
|
|
The Split Screen icon allows you to divide your working document into two screens. This option is handy when you need to work on two different areas of the same document. Click and hold you left mouse button and drag down to split the screen. To remove the split, point to the dividing line, drag up until the split disappears. | |||
|
|
The Editing screen is the empty space in the middle of the screen. This is where you enter text to create a new document, or retrieve a document already saved on your disk, or make changes to a document. | |||
|
|
Vertical Scroll bar, enable you to view the parts of your text with the help of the mouse. | |||
|
|
Page Up button. | |||
|
|
Page Down button | |||
|
|
Horizontal Scroll bar, in the example the horizontal is inactive as the screen can show the full width of the page. | |||
|
|
The Status bar which appears at the bottom of the screen, displays the location of the insertion point, number of pages and the time of day | |||
![]()
|
Have a problem and can't
find the answer on our site?
Click Here To
Contact Us. |
|
Want to know what people say about us? Visit our Comments page. |
|
Let us know what you think about our site or want
to offer any suggestions. |
|
Thanks for visiting |
||
 |
|
 |
|
|
 |
|
|
|
 |
|
|
|
||
|
These links will lead you into our
framed website. It is best viewed at a screen
resolution of 1024 x 768
dpi, however, 800 x 600 dpi will
also work. |
||